
About the Apiary
An informative and sometimes humorous column published in
The New Zealand Beekeeper Journal
HELP YOUR BEES THRIVE IN SPRING
About the Apiary - September - 2016The cold winter weather has finally arrived. Up until now, the warm conditions have promoted the flowering of our winter species and maintained the flowering of a lot of ornamentals in the urban areas. Along the coastal fringe, tree lucerne and some species of wattle are in full flower. Once the frost has cleared and the afternoon sun has warmed the hives, the bees are able to fly and bring in valuable pollen and nectar, which is necessary for continued brood rearing.
With increased brood production, more and more of the hive’s reserves are being used. These are being turned into bees that will replace your winter bees that have worn out through maintaining a brood temperature and feeding larvae. Quite a few will be lost during these afternoon foraging trips, caught by a cold breeze or a rain shower. Some of our darker bees are better able to withstand foraging in these marginal conditions.
Bees build a hive population that will bring in a crop for us and enough for them to winter over next year. That’s the idea, but some beekeepers strip out all the honey and feed back sugar syrup. Opinions differ whether this affects the bees. My opinion is that beekeepers doing this are ageing their autumn bees by requiring them to turn the syrup into honey. Natural honey contains minerals and a few vitamins that bees need which are not present in sugar, so they use their body reserves to substitute these. The same applies to pollen. Supplements are good at stimulating brood development but they do not provide everything a bee requires, so some natural stored pollen is also required.
Some hives bolt ahead in the spring while others just chug along. Those that bolt ahead generally have a new productive queen and are relatively free from nosema and other malaise, but these hives can quickly run out of feed if sufficient stores were not left on the hive or fed to them in the autumn.
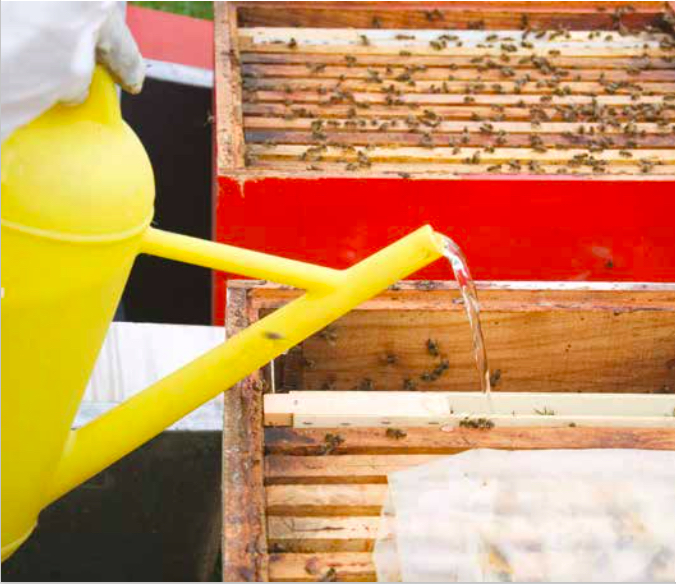
Generally, in the spring commercial beekeepers start feeding a 65% sugar/water mix and a pollen substitute patty to stimulate brood rearing. This has to continue on a two- to three-weekly basis until natural nectar and pollen sources are available. The amount fed depends upon the colony size. We like the bees to take up this supplement quickly so it’s not wasted.
Doing the maths
To work out how far five litres of sugar syrup will go, do the numbers. Think about the quantities bees require to produce a bee: a cell of pollen and a cell of honey. To produce one frame of bees requires one frame of pollen and one of honey. Sixty-five percent sugar syrup is only 50% of the same volume of stored honey, as it has to be inverted and dehydrated to below 20% moisture.
One litre weighs one kilogram. A full-depth frame holds 2.5kg of honey. So with each five-litre feed, you are providing only the equivalent of a frame of honey. A strong colony, two storeys high with eight to 10 frames with brood can use three frames of honey in a week of inclement weather when bees cannot forage. Some beekeepers also provide raw sugar in the other side of the feeder to cover the gaps when beekeepers may not be able to access hives to feed them due to wet, sodden soils. It’s a good reason to winter hives near all-weather access tracks.
Once feeding starts, it’s important to carry on feeding. Strong hives can quickly run out of honey. When this happens, the bees will cannibalise drone eggs and then worker eggs before starting on the larvae. By the third week without food, the bees would have started cannibalising capped larvae. If the hive was fed at this point, the nurse bees will have to start again rearing brood but there will be no emerging brood for 21 days, so the bee population will decline considerably as the older foragers die off. If this happens, it’s best to give the hive a boost of brood and nurse bees to get the hive back on an even keel of growth.
Begin your hive inspections
As the weather permits (i.e., when it’s warm enough to have your arms exposed without them feeling cold), we start spring brood inspections. During the inspection you will notice that some hives have large populations of bees and brood. As soon as the bees have spare resources they will commence producing drone brood. Drones require more food and bee resources, so the colony has to be really productive with good pollen and nectar coming in before they start drone production. The hives that are the first to produce drones are the hives most likely to swarm. Mark these for special attention next inspection.
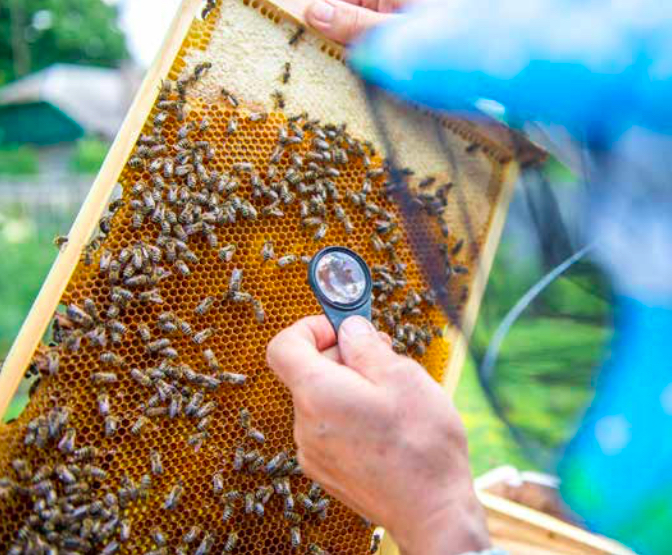
Check that each hive has at least three frames of honey and start feeding when the hive reaches this level. Do a complete inspection of all brood frames for AFB. Learn to flick off the cappings of those capped cells that remain in a patch of emerging brood. Learn what healthy brood looks like and check anything very carefully that’s off-coloured. If you are not sure, get a second opinion or send in a sample after advising our AsureQuality team.
Check that the hive has an adequate ring of pollen surrounding the brood and check the number of cells missed amongst the sealed brood. If more than 15 per 100 cells are missed, then consider replacing the queen. Don’t just assume you have an old queen if there is spotty or patchy brood. It may be because the bees were short of pollen when these bees were produced. Look at the patches of new larvae. If they are even and all the same age, the queen is OK. Sometimes the brood produced earlier in the month was produced under stressful conditions, so might not be as good as that produced later in the month when the hive had better nutrition.
I also find and mark my queens. Don’t assume because you find one queen that there isn’t another in the colony. Some colonies supersede the queens but the old one is not killed and can be found not far from the new queen, although the old queen is laying at a reduced rate. (Some of these two-queen hives boom away early because of the increased laying rate.)
In my inspection, I also clean off the propolis build-up on the shoulders of the end bars so I end up with frames that are hard up against each other, giving the correct bee space.
I’ll also move any old frames, those with more than 10% drone brood cells, are too dark to see light through and those with broken lugs to the outside of the supers so they can be changed when I next go through the hives. Try to institute a frame replacement regime where 30% of the brood frames are replaced each year to promote better bee health.
. Lids are fused together with a soldering iron but can be plastic welded. Photo: Frank Lindsay.")
This alcohol wash container is made by Dr Medhat Nasr in Canada. It uses #8 wire galvanised mesh (the same as used in pollen traps). Lids are fused together with a soldering iron but can be plastic welded. Photo: Frank Lindsay.
Replace any gear that won’t take you through the season, starting with the hive stand or the pallet the hive(s) stand on. Nothing is worse than a hive full of honey frames tipping over and damaging the frames when the weight goes on.
Place varroa strips during inspections
Put in varroa strips at the same time that you inspect your hives. Follow the instructions on the packet. Most now go by the number of frames covered in bees (one strip for up to five frames of bees, two strips for six to 10 frames covered in bees, and so on). What we have learnt from overseas beekeepers is that we should sample the bees to determine the mite percentage before we put in strips, and sample again two weeks after the strips are removed at the end of a 42-day treatment period.
You can do this by sugar shake or an alcohol wash technique. What is important is that you take 300 nurse bees (half a cup) from a frame of ‘open’ brood. This is where the phoretic mites are mostly located so it will give an accurate mite count. Leave the bees in the jar and apply either icing sugar or an alcohol or soap wash so the bees are well covered. Leave for a few minutes and then shake the mites off. The sugar shake should be repeated again to get up to 76% of the mites off the bees. Canadian beekeepers test hives with an alcohol wash if they get seven or more mites in 300 bees they treat. I would recommend we do the same.
These treatments are well explained on Randy Oliver’s website (http://scientificbeekeeping.com/an-improved-but-not-yet-perfect-varroa- mite-washer/). Alternatively, Google ‘varroa mite sugar shake’ for a PDF of instructions.
It’s really important that New Zealand beekeepers adopt these practices as we now have mites that are resistant to both Apistan® and Bayvarol® in some areas. Failing to check could see your hive dead and robbed out halfway through the season. The days of putting in strips and expecting a 96% kill are gone.
When to super your hives
If the bees are filling most of the bottom super frames and are hanging down below the bottom of at least half the frames, it’s time to put on an additional super of drawn frames to give the bees room to expand.
Bees do not see foundation frames as a resource, so just putting a super of foundation on a hive does nothing as the bees will be slow to move into it. If you only have foundation frames for the next super, lift two outside frames from the super below and place them in the centre of the new super, with foundation frames either side of these. (Replace foundation frames in the spaces left below.) Don’t try to put foundation frames into the middle of the brood nest as this will split the brood nest. If the weather suddenly turns cold, the bees could abandon one side of the brood nest, which could result in chilled brood.
Finally, if you are feeding or have excess moisture down the sides of the super or covering the whole of the inner cover, raise the inner cover/crown board/split board up slightly from the top super by placing small twigs or matchsticks at each corner under the board so the excess moisture can get away. Replace the roof and mark the calendar for the next inspection in 10 days’ time.
On your next visit 10 days later, the bees will have started drawing out the cells on the foundation frames next to the drawn-out frames. Move one of these newly drawn or partially drawn frames into the middle between the drawn frames to encourage the bees to draw out more frames on either side again. If they haven’t started and you need more drawn frames, feed the hives sugar syrup.
Keep your hives building
By the end of the month, really strong hives may have started building queen cell buds.
This is normal and removing them only makes the bees create more. I tend to remove any in holes or at the side of frames but leave those created along the bottom bars of the frames. This means that when I do quick inspections, I only need to split the top brood super and look along the bottom bars for larvae in the queen cell buds. If any have eggs or larvae, the hive is going to swarm and you have to provide corrective action. If you don’t, the hive will swarm and there goes your honey crop into the trees.
Far too many hobbyists miss this or fail to act on time. Don’t let it happen to you this spring. Start checking for queen cells using this two- minute check of splitting the first and second brood supers and looking for queen cells every nine to 10 days.
Nowadays, commercial beekeepers don’t let hives get into this position. During the first inspection in September, they will equalise all hives so they contain the same amount of bees and frames containing brood. They may reduce a hive with brood in eight frames back to six frames, adding frames of brood and bees to strengthen weaker ones. Another technique to strengthen a hive is to add more nurse bees by shaking them on to the entrance of a weak hive and guiding them in with a little smoke.
I use Miller type (dry sugar) feeders with a centre hole on my hives. If you aren’t using them as a feeder, turn them over so that excess nurse bees will start to gather in the feeder to relieve congestion in the brood chambers. It’s just a matter of swapping the feeder to a weaker colony. Spray the top of the hive they are being transferred to with air freshener to disguise the difference in hive scent. Generally, unless they are a different species, they will be accepted without fighting.
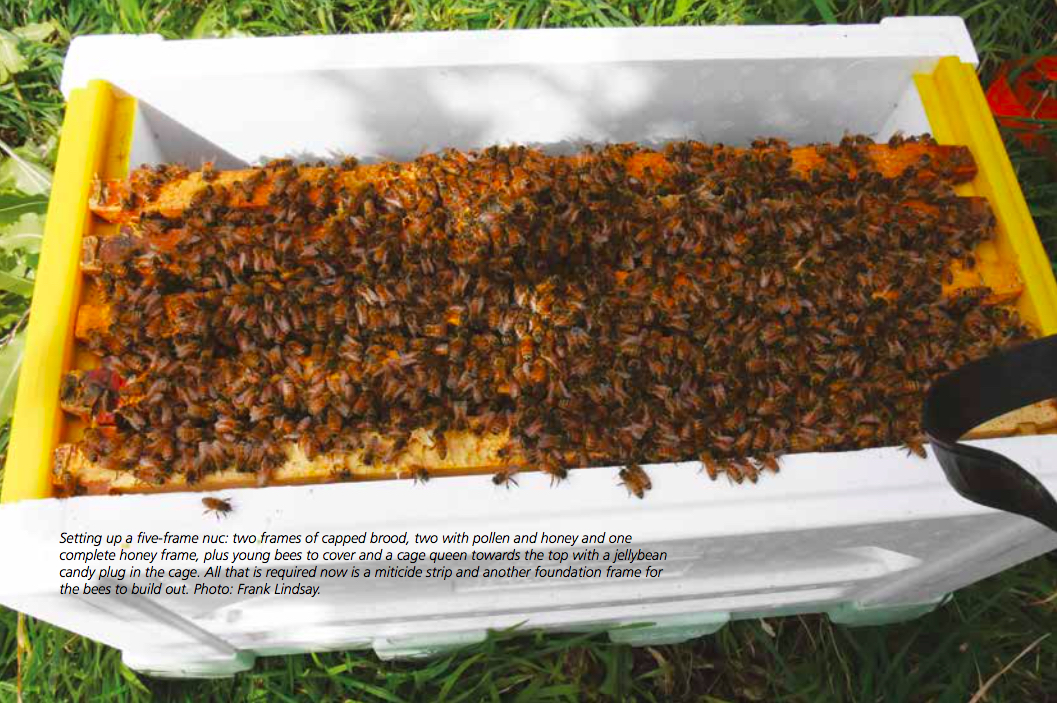
The same can be done with small nucs, or you can put in a frame of emerging bees to a weak nuc, but make sure the queen is not on it. A nuc can take an extra frame or a shake of bees but if more frames of bees are added at one time, the new bees are likely to kill the queens unless we dismantle the hive’s pheromone defences with a spray of air freshener. In fact, it’s a good idea to use this spray technique whenever extra bees or brood is added. And it’s preferable if the new frames of brood are placed between the existing brood frames to preserve the shape of the brood nest.
Don’t forget: before removing or placing new frames in a colony, check both for AFB.
Things to do this month
Do an AFB check. If you find any, separate off the stored supers that came from that particular hive and destroy them. If you can’t identify the individual supers but know which supers came from that apiary, put an apiary quarantine on that particular apiary for 18 months using those supers only in that apiary.
Feed hives if necessary: hives should have a minimum of three frames of honey in them at all times.
Spray or weed whack the vegetation surrounding hives.
Check stored supers for wax moth. Cull old frames from the brood nest or work them gradually to the outside if they contain brood so they are replaced within a month.
Get the wax dipper going to dip new and reconditioned supers so that replacement hive parts are ready for another season.
Put in early mite treatments or check mite levels using sugar shake or an alcohol wash. Recording the natural fall using mesh bottom boards over a week will give you an indication of mite numbers but not the percentage. Don’t forget to rotate treatments to prevent further resistance developing.
Plant a bee tree close to your apiary for future pollen and nectar.
Frank Lindsay